Introducing the purpose of the series and the need to intimately know the tools.
This blog is the 2nd part of a series about systems that support, validate and improve the design process and implementation of chatbots. Part 1 can be found here.
Standard Design Process Overview
If we follow Googles guidelines for the conversational design process we observe the following steps:
- Identify your users
- Identify key use cases
- Create a (system) persona, pick your voice.
- Sample dialogs & high level flows
- Quick testing & iteration
- Design for the long tail
- Scale your design.
In this series, I seek to provide new insights. Therefore, I will not address steps 1 and 2 since both steps are not specific to chatbot design, but are rather classical business questions. I will also not address the third question since a large percentage of blogs about chatbot design focus on this question. Therefore, I will start with the fourth step:
Sample Dialogs & High level flows
Google’s guidelines for this step and many blogs address how to write proper sample dialog. In contrast, the design of flows is rarely addressed.
My hypothesis: We should not settle for only high-level flows.
I truly believe that it is of the utmost importance to write sample dialog and draw high-level flows before continuing with the next step. However, see this as just step 4a.
Step 4b. Structure the Flows
If we want to minimize the number of issues the translation of the design to the final project we need to get the design as close to the implementation as possible. This is why we would use Figma or Adobe XD for web design.
For chatbot design, there were no such tools available. In my opinion, a tool for good chatbot design needs to nail 3 core elements:
- A clear visual representation of the flow itself (this seems trivial).
- Easy and quick to update (iteration speed should not stifle creativity).
- Close to the structure needed for implementation.
Do not underestimate the importance of element 3, having a quick visual tool that requires you to accept the limitations of the implementation will ensure that the design does not need to be changed on the fly during the implementation phase. Instead, this change in structure can now boost creativity because it now forces you to observe your flows from a different perspective.
I implement my chatbots using Dialogflow which has the intent as the highest level building block, and you structure the navigation between intents using what the training phrases (the accepted user’s utterances) and using context (a building-block for maintaining state). So I need a representation that both gives a good visual indication of flow, but also allows me to extract the notions of intent, training phrases and context.
Since Dialogflow does not provide a high-level overview of the implementation nailing this conversion is extra important.
My Humble Tool for Structuring
Since there was nothing that I could find I that fulfilled these purposes I had to build something myself. The resulting tool can be found in the card below.
The tool converts a YAML document containing the intent name the agent's text (questions/response) and has a separate system and user colors. Context is still left out of the picture though (but will be addressed in my next blog).
An example of the YAML is shown below. (click here for the complete example)
system:
    greeting:
        name: Greeting
        text: Welcome to your launchpad for all things Google IO?
        note: YOU MIGHT WANT TO ADD RANDOM NOTES THAT SHOULD NOT BE VISIBLE IN THE GRAPH.
        todo: Turn the text into a real sentence!
        to:
            - pre-io
            - ask-attending
            - post-io
    pre-io:
        name: Pre I/O Meny
        text: As the Keeper of I/O-Specific Knowledge consider me your guide...
    ask-attending:
        name: Ask Attending
        text: The festival's underaway right now. Are you one of the lucky attendees?
        to:
            - attending-yes
            - attending-no
Using this tool has some clear benefits:
- You no longer need separate documents for flows and sample sentences.
- Adding/removing stuff is much faster and easier than with paper (or even most digital drawing tools).
- You can leave notes-to-self. The for every intent (e.g. greeting) only
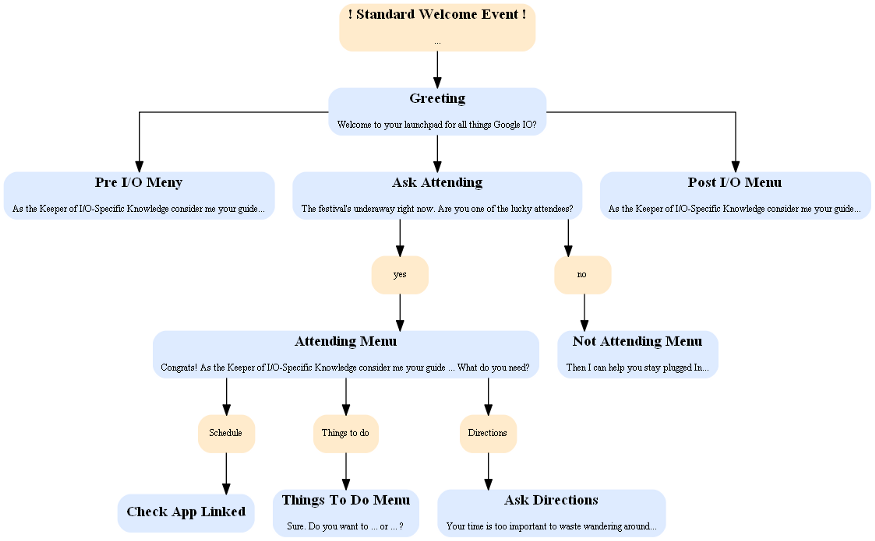
name,textandtoare parsed all other attributes can be added just for yourself. - Most importantly it generates very clear visualizations (as shown below).

Finally
The next blog will be about how to ensure that your implementation adheres to the design. We will introduce a tool that generates high-level flows from the actual implementation in DialogFlow. If you don’t want to miss this you can follow this website. And if you have ideas of your own please join in on the discussion.
